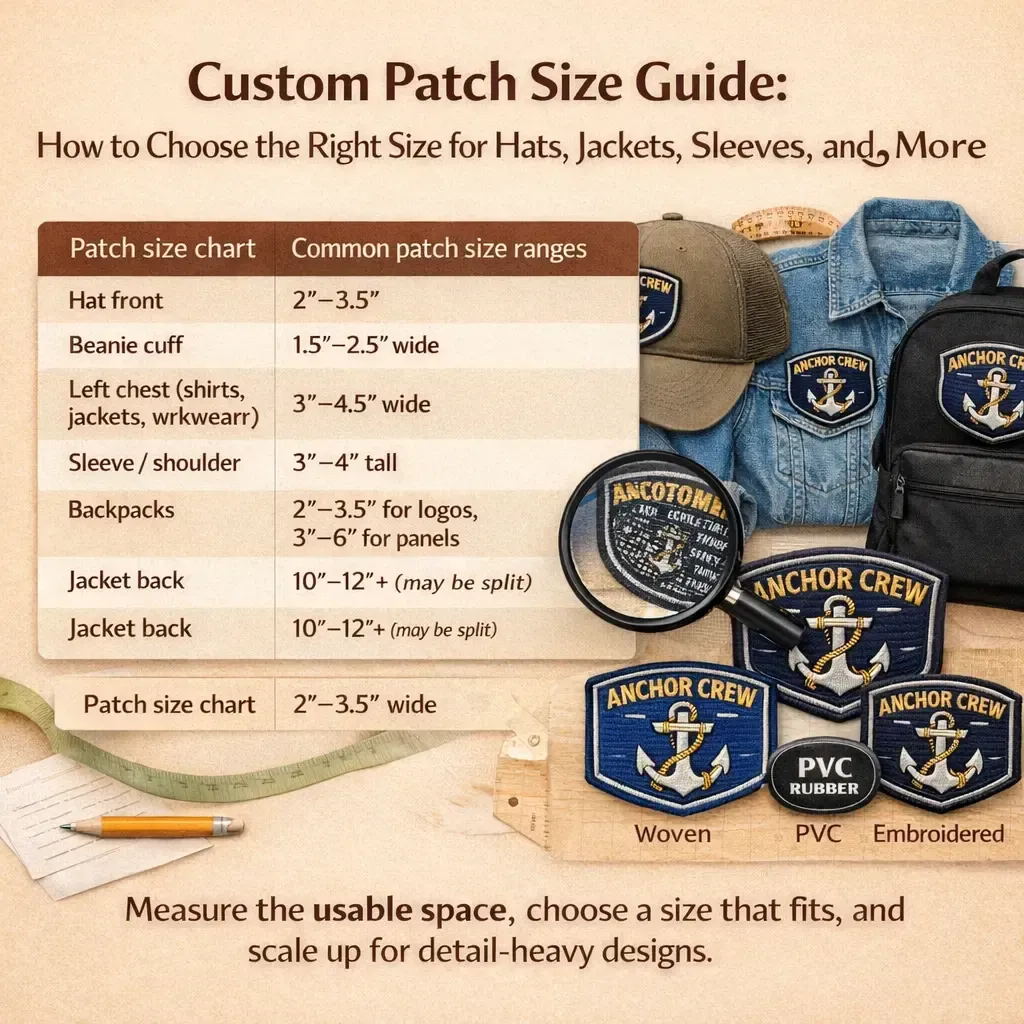
When you’re building a brand through apparel, custom patches sizing is a foundational element that signals quality and attention to detail. Getting the sizing right matters for legibility, fabric interaction, and how the patch sits on a garment. A thoughtful approach to sizing helps patches read clearly on different fabrics and from a distance, reducing distortion and misperception. A well-documented patch sizing guide keeps teams consistent across orders and garment types. With careful consideration of placement and color harmony, you create patches that feel integrated rather than tacked on.
Designers often describe this work in terms of badge dimensions and emblem scale, focusing on balance with the garment rather than just size. In practical terms, the goal is branding patch integration that preserves thread color fidelity and a cohesive look across fabrics. When moving to production, teams rely on placement strategy, backing options, and finishing touches to ensure durability and a polished appearance.
Understanding Custom Patches Sizing for Brand Apparel
Sizing is the foundation of a balanced patch design and a key driver of perceived quality. When you think about custom patches sizing, you’re aligning the logo’s legibility with garment proportions so the patch communicates your brand without overwhelming the wearer. A thoughtful approach uses a patch sizing guide to map the logo’s native size to common garment contexts, from caps to outerwear, while preserving embroidery readability and avoiding crowding or distortion.
In practice, adopt a tiered sizing strategy: small patches for subtle branding on hats, medium patches for left-chest logos on polos, and large patches for back designs on jackets. Always test on representative fabrics, maintain a clean margin around the design, and preserve the logo’s aspect ratio. Remember that backing and edge finishes can subtly alter the perceived size, so work with standardized templates that keep output consistent across batches.
Achieving Consistent Custom Patches Color Matching Across Fabrics
Color sets the mood and the credibility of your patches. With custom patches color matching, you aim for predictable reproduction across fabrics, threads, and lighting conditions. Rely on standardized references such as Pantone swatches or supplier thread catalogs, establishing a color palette for each project to guide production notes and enable repeatable results in every batch.
Always test colors on the actual garment or fabric swatch before full production, because thread colors interact with base materials and lighting. Plan for factors like border and backing colors, and document exact color codes for patch face, thread, and backing to maintain consistency across runs, while allowing for minor, acceptable variations.
Patch Sizing Guide for Different Garment Types
This patch sizing guide for different garment types translates sizing theory into practical rules of thumb for hats, polos, jackets, and bags. By aligning patch scale with viewing distance and garment function, you ensure legibility without overpowering the overall look.
Create standardized templates for each garment type, test on representative fabrics, and use these references to drive early-stage approvals. Adjust for fabric weight, drape, and viewing distance so that patch scale remains legible and brand-compliant.
Patch Placement Techniques: Positioning for Impact and Durability
Patch placement techniques emphasize alignment with body landmarks, garment features, and the intended narrative. Positioning a patch correctly can elevate perceived value and durability, whether on a cap, chest, sleeve, or back panel.
Use guide marks, mockups, and curved templates to verify placement before production. Consider fabric curvature and high-friction areas where reinforcement or stitching may be required to keep patches from curling or fraying over time.
Embroidery Patch Alignment: Precision from Design to Wear
Embroidery patch alignment focuses on ensuring the design stays true as it travels from screen or vector to thread and fabric. Consistent alignment helps preserve logo integrity across different garment surfaces and lighting conditions.
Pre-production samples, QA checks for stitch density and alignment, and cross-run confirmation help catch drift before large orders. Document reference points and coordinate system so embroidery patch alignment remains consistent across batches.
Garment Patch Application: Backings, Finishes, and Care for Longevity
Garment patch application covers backing choices, finishes, and the practical steps to attach patches securely. Selecting the right backing and edge finish affects durability, wash resistance, and wear comfort across a range of fabrics.
Discuss care and washing instructions, adhesion types for different fabrics, and how to design for durability. Ensure patch materials, backing, and thread choices withstand repeated laundering and temperature changes to preserve appearance.
Frequently Asked Questions
What is custom patches sizing and why is it essential for brand-ready apparel?
Custom patches sizing is choosing patch dimensions that balance readability, garment proportion, and durability. Start with the logo’s native size from a vector, crop to essentials, and adjust for viewing distance. Use a patch sizing guide to standardize outputs across batches, consider fabric and backing, and test patches on representative swatches to confirm readability and fit.
How does patch sizing influence legibility and garment proportions across different items, and what does a patch sizing guide recommend?
Patch sizing directly affects how legible the design is at typical viewing distances and how the patch sits on each garment. Follow a patch sizing guide that assigns size ranges by product type (caps, polos, jackets), preserve aspect ratio and margins, and test on real garments to ensure the patch reads well without crowding.
How does custom patches color matching drive color fidelity across fabrics, and what steps improve consistency?
Custom patches color matching relies on standardized references (Pantone, thread catalogs) and testing on actual fabrics to confirm interactions between thread and base material. Establish a color palette for the project, document exact codes for thread, patch face, and backing, and plan for slight variations within an acceptable tolerance to keep consistency.
What are patch placement techniques to maximize impact and durability on different garments?
Patch placement techniques should align with body landmarks (e.g., chest center on polos, front center on caps) and use templates or mockups before production. Account for fabric curvature, drape, and high-friction areas, and balance vertical and horizontal alignment to achieve a durable, visually effective result.
How can embroidery patch alignment be ensured across production runs?
Embroidery patch alignment is maintained by using precise guides, standard templates, and QA checks. Produce pre-production samples, verify stitch density and edge finishes, and use consistent marks on fabric to ensure patches align correctly across batches.
What should a patch sizing guide include to standardize production across garments?
A patch sizing guide should specify size ranges by garment type, recommended aspect ratios and margins, testing requirements (swatches), and approval steps. Include backing considerations, color references, and templates to ensure every order starts from the same baseline and maintains consistency across runs.
| Aspect | Key Points | Practical Guidance |
|---|---|---|
| Sizing | Foundation of balanced patch design; affects legibility, fabric interaction, and garment proportions | Start with the logo’s native size; consider viewing distance; preserve aspect ratio and margins; use a patch sizing guide; plan for fabric/backing; test on representative fabric swatches. |
| Color matching | Color harmony across fabrics and patches; standardized references; test on real fabrics; plan for thread vs fabric interaction; border/backing colors; overall color strategy; tolerance and preproduction samples | Establish a color palette; test on actual garments; document thread/patch/backing codes; ensure repeatable color across batches. |
| Placement | Placement aligns with body landmarks, garment features, and the intended visual narrative; use templates; balance; account for fabric curvature; plan for different garment types; mockups and approvals | Create templates and mockups; verify placement before production; coordinate with garment type; consider caps, jackets, sleeves; ensure durability considerations are integrated. |
| From concept to production | Prototyping and QA; material choices; environmental and care considerations; align design intent with practical constraints | Prototype in small batches; perform quality checks; select backing materials and thread types; test wash/care; obtain stakeholder approvals. |
| Common pitfalls | Mistakes include sizing without garment context, failing to test color on actual fabric, and placing patches where they conflict with logos, plackets, or zippers | Always test on real fabrics; use templates; verify with stakeholders early; address feedback to avoid costly reworks. |